Understanding QuickBooks API Key Setup for Seamless Integration

Richard Thornwell
23 June 2026
Understanding QuickBooks API Key Setup for Seamless Integration
Introduction
Integrating your business applications with QuickBooks can transform the way you manage finances, automate workflows, and gain real-time insights into your company’s financial health. But before you can unlock the power of QuickBooks integrations, there’s one critical first step you must get right: setting up your QuickBooks API key.
Whether you’re a developer building a custom integration, a business owner connecting third-party tools, or an IT professional tasked with streamlining accounting workflows, understanding the QuickBooks API key setup process is essential. A misconfigured API key can lead to failed connections, security vulnerabilities, and hours of frustrating troubleshooting.
In this comprehensive guide, the qulkcbooks-lntult team walks you through every step — from creating your Intuit Developer account to generating your credentials, configuring OAuth 2.0 authentication, and making your very first successful API call. By the end, you’ll have a rock-solid foundation for any QuickBooks integration project.
What Is a QuickBooks API Key and Why Does It Matter?
Before diving into the setup process, let’s clarify what we mean by a QuickBooks API key and why it’s so important.
The Role of API Keys in QuickBooks
QuickBooks Online uses the Intuit Developer Platform to provide API access. When we refer to a “QuickBooks API key,” we’re actually talking about a set of credentials that includes:
- Client ID — A unique identifier for your application
- Client Secret — A confidential string used to authenticate your app
- OAuth 2.0 Tokens — Access tokens and refresh tokens that authorize API requests
- Authentication failures that block your integration entirely
- Security vulnerabilities from improperly stored credentials
- Rate limiting issues caused by misconfigured token refresh logic
- Data sync errors that can corrupt your financial records
- Compliance violations related to handling sensitive financial data
- Navigate to [developer.intuit.com](https://developer.intuit.com)
- Click Sign Up or Get Started
- Enter your email address and create a secure password
- Verify your email address through the confirmation link
- Complete your developer profile with your business information
- Navigate to the Dashboard in your developer account
- Locate the Sandbox section
- Note your sandbox company credentials (you’ll need these later)
- From your Intuit Developer Dashboard, click Create an App
- Select QuickBooks Online and Payments as your platform
- Give your app a descriptive name (e.g., “My Company ERP Integration”)
- Select the scopes (permissions) your app requires:
- Client ID (also called App ID): This is your public identifier. It’s safe to include in client-side code, though best practices suggest keeping it server-side.
- Client Secret: This is your confidential key. Never expose this in client-side code, public repositories, or logs.
- For development: `https://localhost:3000/callback`
- For production: `https://yourdomain.com/api/quickbooks/callback`
- Must use HTTPS (except localhost for development)
- Must match exactly what you specify in your authorization request
- Can include multiple URIs for different environments
- Should point to a route in your application that handles the OAuth callback
- Authorization Request — Your app redirects the user to Intuit’s authorization server
- User Consent — The user logs in and grants your app permission
- Authorization Code — Intuit redirects back to your app with a temporary code
- Token Exchange — Your app exchanges the code for access and refresh tokens
- API Calls — You use the access token to make authenticated API requests
- Token Refresh — When the access token expires, you use the refresh token to get a new one
- accesstoken — Valid for 1 hour, used to authenticate API calls
- refreshtoken — Valid for 100 days, used to obtain new access tokens
- tokentype — Always “bearer”
- expiresin — Token lifetime in seconds (typically 3600)
- Encrypt tokens at rest using AES-256 or equivalent encryption
- Store tokens server-side in a secure database, never in browser storage
- Implement automatic token refresh before the access token expires
- Log token refresh events for debugging and audit purposes
- Revoke tokens immediately when a user disconnects their QuickBooks account
- Invoices: `GET /v3/company/{companyId}/invoice/{invoiceId}`
- Customers: `GET /v3/company/{companyId}/customer/{customerId}`
- Payments: `GET /v3/company/{companyId}/payment/{paymentId}`
- Accounts: `GET /v3/company/{companyId}/account/{accountId}`
- Reports: `GET /v3/company/{companyId}
Important: QuickBooks uses OAuth 2.0 as its authentication protocol. Unlike simple API keys used by some platforms, OAuth 2.0 provides a more secure, token-based authentication system that protects both your application and your users’ data.
Why Proper Setup Matters
Getting your API key setup right from the start prevents a cascade of common problems:
Step 1: Creating Your Intuit Developer Account
The journey to a working QuickBooks API integration begins with the Intuit Developer Portal. Here’s how to get started:
Register for a Developer Account
Set Up Your Sandbox Environment
Once your account is active, Intuit provides you with a sandbox company — a test environment that mirrors a real QuickBooks Online account. This is where you’ll test your integration without risking real financial data.
Pro Tip: Always develop and test in the sandbox environment first. Never test API calls against a production QuickBooks company with real financial data until your integration has been thoroughly vetted.
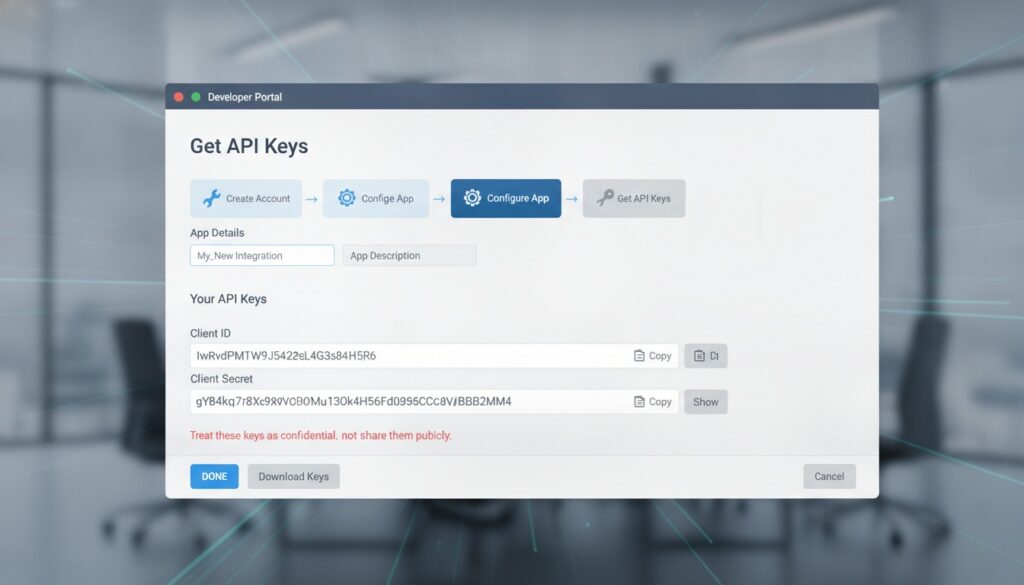
Step 2: Creating an App and Generating Your API Credentials
With your developer account ready, it’s time to create an application and generate the credentials you’ll need for authentication.
Create a New App
Retrieve Your Client ID and Client Secret
After creating your app, you’ll be taken to the app’s settings page where you can find your credentials:
Configure Redirect URIs
OAuth 2.0 requires a redirect URI — the URL where Intuit will send users after they authorize your app. Configure this carefully:
Step 3: Implementing OAuth 2.0 Authentication
Now comes the most critical part of the setup — implementing the OAuth 2.0 authorization flow. This is what transforms your static credentials into dynamic, secure access tokens.
Understanding the OAuth 2.0 Flow
The QuickBooks OAuth 2.0 flow follows these steps:
Building the Authorization URL
Your authorization URL should include these parameters:
“`
https://appcenter.intuit.com/connect/oauth2?
clientid=YOURCLIENTID&
redirecturi=YOURREDIRECTURI&
responsetype=code&
scope=com.intuit.quickbooks.accounting&
state=RANDOMSECURITYSTRING
“`
The `state` parameter is crucial for preventing CSRF attacks. Generate a random string, store it in the user’s session, and verify it when the callback is received.
Exchanging the Authorization Code for Tokens
Once the user authorizes your app, Intuit redirects to your callback URL with an authorization code. Exchange it for tokens using a POST request:
“`
POST https://oauth.platform.intuit.com/oauth2/v1/tokens/bearer
Content-Type: application/x-www-form-urlencoded
Authorization: Basic BASE64(clientid:clientsecret)
granttype=authorizationcode&
code=AUTHORIZATIONCODE&
redirecturi=YOURREDIRECTURI
“`
The response will include:
Token Storage Best Practices
How you store your tokens is just as important as how you generate them:
Security Warning: Treat your Client Secret and OAuth tokens with the same level of care as passwords. If compromised, an attacker could gain full access to your users’ QuickBooks data. Rotate your Client Secret immediately if you suspect a breach.
Step 4: Making Your First API Call
With your tokens in hand, you’re ready to make your first authenticated API call to QuickBooks Online.
Testing with a Simple Query
Let’s start with a basic request to retrieve company information:
“`
GET https://quickbooks.api.intuit.com/v3/company/YOURCOMPANYID/companyinfo/YOURCOMPANYID
Authorization: Bearer YOURACCESS_TOKEN
Accept: application/json
“`
If everything is configured correctly, you’ll receive a JSON response containing your company’s details — name, address, fiscal year settings, and more.
Common First-Call Errors and Solutions
| Error Code | Meaning | Solution |
|—|—|—|
| 401 Unauthorized | Invalid or expired access token | Refresh your token and retry |
| 403 Forbidden | Insufficient scopes | Re-authorize with correct scopes |
| 404 Not Found | Wrong Company ID | Verify the `realmId` from your OAuth response |
| 429 Too Many Requests | Rate limit exceeded | Implement exponential backoff |
| 500 Internal Server Error | Intuit server issue | Wait and retry with backoff |
Exploring Key Endpoints
Once your first call succeeds, explore these commonly used endpoints: